The Level that thinks it's an Alignment Telescope
The 545-1 combines many of the capabilities of our alignment telescopes with our precision sight level. When paired with a dual axis micrometer (not included), you can measure deviations from the line of sight in both the horizontal and vertical directions simultaneously. This provides a means of easily combining two types of measurements - level and straightness - in one instrument. This is beneficial for applications such as bore alignments for drive systems, turbine alignments, gearboxes, extruders, engine bearing lands and laboratory optical paths. The 545-1 is an effective configuration when large mechanical components must be set level as well as straight.
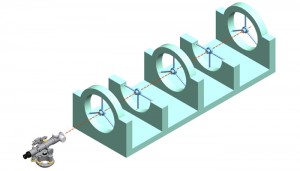
 An engine frame alignment where the bearing centerline must be evaluated for straightness as well as level. Many rotating machine components have these combined alignment requirements.
|
 The 545-1 gives you the ability to establish a line of sight which is extremely level. The two-speed telescope tilting screw has a coarse thread to get you in the ballpark quickly, and a fine thread for those precise adjustments which bring you into perfect level. In addition, a coincidence-type level with 2.5 times magnification optically "folds" both ends of the precision level vial's bubble together, enabling you to detect the tiniest deviation from level. One arcsecond of tilt is discernible using this "coincidence" vial methodology.
This instrument includes a telescope having adjustments to maintain the line of sight straight throughout a focusing range of two inches to infinity, allowing the instrument to be located in the tightest of setups. This straightness is maintained at ±0.001" (0.025 mm) from two inches to 17 feet (50.8 mm to 5.2 m) and one arcsecond from 17 feet to infinity. The main telescope tube has a removable section to facilitate conversion for autocollimation, autoprojection, or installation of a right angle eyepiece. When paired with an optical micrometer (not included), you can produce repeatable readings with a resolution of 0.001" (0.025 mm).
 The reticle's filar/bifilar pattern makes for easy use with our optical tooling scales, or during collimation and autocollimation procedures. The horizontal axis pivots directly over the vertical axis, making the change in plane height less than 0.0001" for tilts up to 5 arc minutes either above or below horizontal. This important feature eliminates the need to perform the time-consuming precision plumbing procedure for leveling projects. All 545 models use high quality base components and leveling vials similar in design to our model 76-RH transit, allowing this instrument to sweep precise planes. For rough leveling, the unit has a circular level vial mounted on the base.
Our extreme attention to engineering details means that you can take measurements with accuracies that are difficult to achieve by conventional mechanical methods. Read more about our levels for additional specific information on their many features and uses.
May Be Used With
160 Series Coordinate Micrometer
190 Series Coordinate Micrometer
186 Plastic Autoreflection Target
188 Glass Autoreflection Target
193 Right Angle Swivel Eyepiece (discontinued)
193-L Right Angle Swivel Eyepiece, Illuminated Adapter
196-1 Combination Projection, Auto-Collimation, Fixed Right Angle Eyepiece Unit (must be installed at the factory)


