Precision Sight Levels
Levels are great for a variety of tasks revolving around the requirement for establishing planes that are orthogonal to the gravity vector. These instruments are optimized for easy leveling of the line of sight at any azimuth position.
Quality
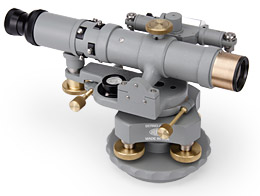 Our levels enjoy the same reputation for producing quality results on the job as do our transits. Made entirely in the USA, our levels are fabricated using stainless steel, bronze, brass, and fine optics, all held to exacting tolerances. These instruments provide you with:
- Precision elevation measurement (±0.001")
- Tremendous flexibility and reliability in various applications and environments
- Quick setup and measurement time
- Easy operation
- Both survey and build operations
- Rugged construction
- On-site calibration capability
Variety of applications
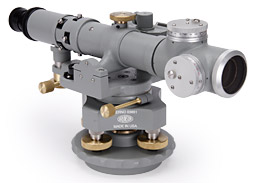 You came to the right place if you want to measure deviation from level using the precision of optical methods and the ease of a simple technology. Use the 545-190 to establish a line of sight that is dead level (within ±1 arcsecond). Then use the optical micrometer on the instrument to measure the deviation of any object from this optical line to within ±0.001". Our optical tooling scales are the perfect complement for this measurement technology, extending the “reach" of the optical reference line to almost any distance required. This instrument is great for a number of applications, such as:
- Leveling machine bases
- Evaluating structural or machinery foundations
- Assessing machine tool ways and table movement
- Checking level of rolls and rolling machinery for plastics, steel, paper, & printing operations
- Checking or setting of sole plates
- Substituting for an alignment telescope when outfitted with a coordinate optical micrometer (see picture above) to perform alignments on engine bores, bearing journals, etc.
- Substituting for a transit when holding a horizontal reference line
- Collimating against mirrors (ex., spindle mirrors on driveshafts or gearboxes)
Precision leveling
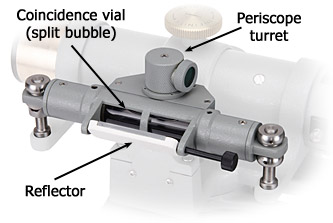 Of course, the “magic" of our levels is how they can so easily and reliably create a precisely level optical line of sight. How is this possible? In use, a bull's eye bubble is provided for rough leveling, accomplished using the leveling screws in the base. Then, a fine-motion screw near the eyepiece end of the telescope subtly tilts the telescope on precision bearings to bring the line of sight to dead-level. This is accomplished by using a coincidence-type level vial system (see photo) with 2½X magnification.
 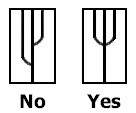 Both ends of the precision level vial's bubble are optically “folded" and brought together, side-by-side, using a mirror path. This enables you to detect the tiniest deviation from level. The human eye is very good at evaluating coincident patterns such as the one created by our precision vial assembly, and one arcsecond of tilt is easily discernible using this “coincident" methodology. It's simple and very effective.
Field Calibration
These instruments can be calibrated and adjusted on-site. This gives you the power to confirm the instrument's optical and mechanical relationships, which are crucial for accurate use. For example, performance of a “peg test", using optical tooling scales held in place by magnetic scale holders in the work area, allows you to determine how accurately the precision level vial is adjusted (parallel to the line of sight).
Autocollimation Capabilities
Our levels are fully capable of performing collimation, autocollimation, and reticle projection, given the correct eyepiece and lighting accessory. For a more in-depth look at optical tooling instruments, principles, and applications, visit our Knowledgebase.
Telescope
Each level has telescope adjustments which will maintain a straight line of sight throughout the focusing range. This straightness is maintained at ±0.001" at near focus range, and within one arcsecond from 17 feet to infinity.
 The eyepiece end of the telescope tube has a removable section to facilitate conversion to autocollimation and/or autoprojection capabilities, as mentioned above, or the installation of a right angle eyepiece. The objective end of the telescope barrel is machined so you can mount an optical micrometer.
The reticle used in our levels is the standard optical tooling filar/bifilar design. This design makes our optical tooling scales easy to read at various distances, and is designed specifically for performing optical techniques such as autocollimation and autoreflection.
Base
The vertical spindle in the base of our levels is a proprietary ball bearing design of our own manufacture. Four dust-shielded leveling screws with 1½" knurled heads and a 3/8"-32 thread allow for rough leveling of the instrument. This type of four-screw leveling system puts the pitch axis coincident with the roll axis, and does not change the height of the instrument as adjustments are made. Errors of this nature frequently occur with instruments having three leveling screws, and those having a tilt axis not coincident with the azimuth axis. The base mounting plate is made of cast bronze with a standard 3½"-8 internal thread.
Finish
The 545 Series levels are painted with a high quality, two-part, textured gray polyurethane enamel coating.


