About Scales
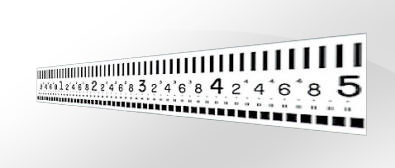
 The perfect measurement partner. Our optical tooling scales provide the perfect partner for our optical alignment instruments, providing tremendous targeting and measurement flexibility. Once a reference line of sight is defined by any of our instruments, optical tooling scales give you the ability to measure lateral deviations to that line of sight from almost any object – and do so with a high degree of precision. Available in both English and metric units, these scales are precisely read using our optical micrometers. The optical micrometer on an instrument acts as a "vernier", and divides the scale's intervals into smaller parts, routinely producing measurement resolutions as small as 0.001" or 0.02 mm. (Of course, you must be sure to use English scales with English micrometers, and metric with metric!)
Our scales are made of hardened tool steel with a matte white surface, and have a glare-reducing topcoat. The paired-line graduations are black to provide maximum contrast. Each inch (or centimeter) is numbered for easy reading, regardless of distance. The largest numerals indicate where each major division begins.
 English unit scales
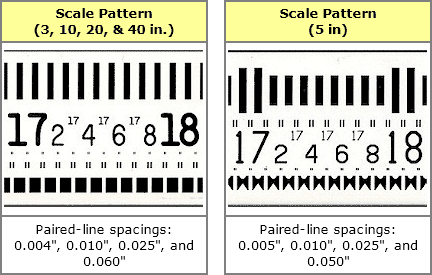
These scales come in 3", 5", 10", 20", and 40" lengths. All have the pattern shown at right except for the 5" scale. The 5" scale has the pattern shown at far right. Both patterns are almost identical and are easy to use with any Brunson or K+E transit or level.
Metric scales
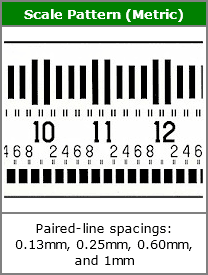
Our metric scales are manufactured just like all of our other scales, using the same high quality materials and the same process. Our metric scales all have the same pattern (image, right).
Multiple shot-distance targets
The pattern on all of our scales is specifically designed to make the scale useful at a variety of focal distances, continuously from zero to about 100 feet (30 meters). A pattern of four distinct paired-line targets (across the width of each scale), appearing as adjacent sets of bars or blocks, repeats over the length of the scale every 0.100" or 0.2 mm, depending upon whether the scale is English or metric.
 The filar/bi-filar reticle in our instruments makes it possible to position the line of sight (using an optical micrometer) accurately between any of the paired line targets on the scale. When close up, the smallest pair of "tick" marks is used. As viewing distance increases, progressively wider paired-line spacings are used.
You won't get lost
It is sometimes possible to use the English-unit scales at such a close distance that the field of view will not include the closest "inch" number, making it impossible to tell which "inch" interval you are reading. We solved this problem by printing the whole inch integer three times over the length of each inch (see the English scale pattern pictured on this page above). Our metric scales do not need this extra accommodation because it is almost impossible to get close enough to a metric scale to lose sight of the "centimeters" digit. Finally, each inch is divided into 10 equal segments; only the even increments are labeled.
Calibration reference scales
We provide special scales for use with calibration applications. Rather than having a graduated scale pattern, these scales have an optical target placed at a known distance from the end. When used in conjunction with our Invar scale extensions, these scales provide a convenient length reference tool for calibrating 3D measurement systems using theodolites and total stations.
Lots of accessories
We offer a number of accessories so you can get the most out of your scales. These include levels, magnets, and other types of holders. We also offer a number of Invar scale extension accessories, which allow you to extend the effective length of your scales as well as increase their flexibility.


